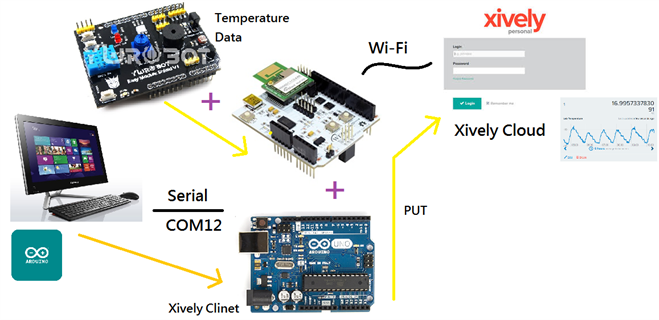
This section for introduce how to implement WizFi250+Arduino Uno and updated the Temperature data to Xively Server.
Before start this section, you also can read the topic for Xively with WizFi250/WizFi270.
Here included the
library for the connection between WizFi250 and Arduino Uno that the source
file shows in Github(web-based Git repository hosting service).
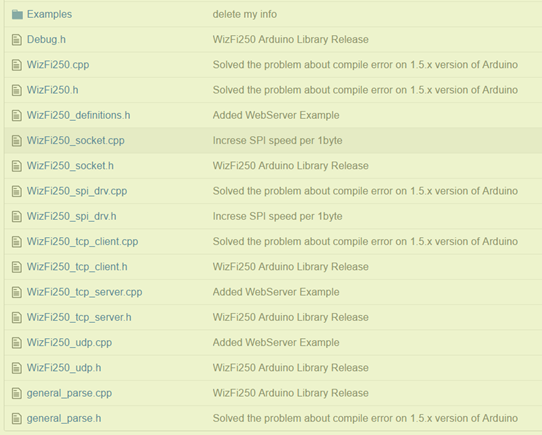
https://github.com/Wiznet/Arduino_WizFi250/tree/master/Software/WizFi250
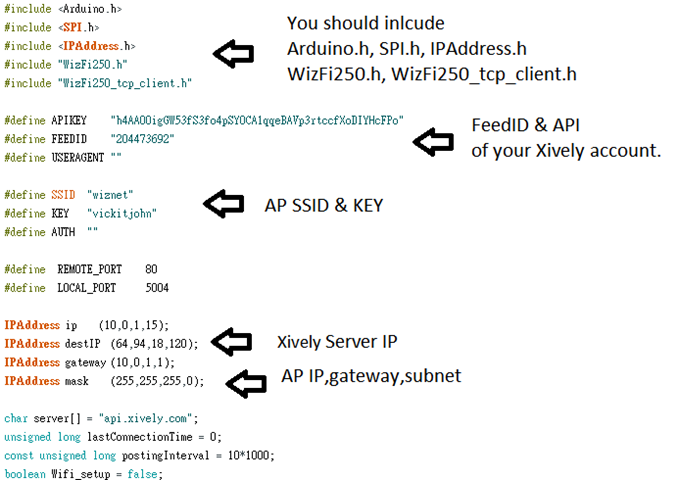
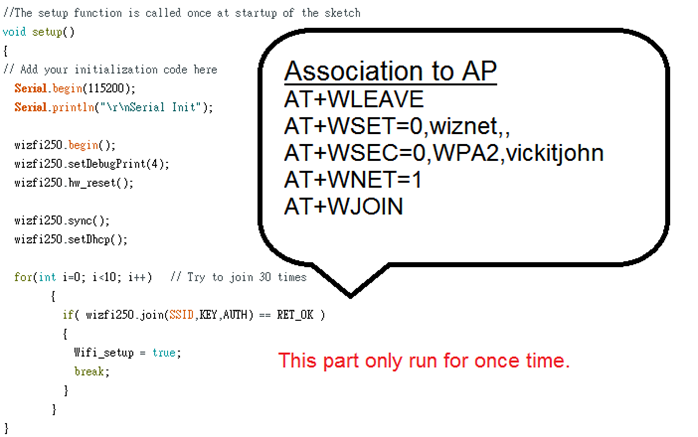
Basic Definition
Association to AP
The is the infinite Loop part for
send data and disconnect
// The loop function is called in an endless loop
void loop()
{
	char TempC[20] = "";
	floatToString(TempC, getTempC(), 2, 7);
	String dataString = "TempC,”;
	dateString += TempC;
	if (Wifi_setup)
	{
		wizfi250.RevPacket();
		if (myClient.available())
		{
			char c = myClient.recv();
			if (c '= NULL) { 	Serial.print(c);
			}
		}
		else
		{
			if (!myClient.getIsConnected() && lastConnected)
			{
				Serial.printIn();
				Serial.println("disconnecting.");
				myClient.stop();
			}
			if (!myClient.getIsConnected() && (millis() - lastConnectionTime > postingInterval))
			{
				sendData(dataString
				};
			}
			lastConnected = myClient.getIsConnected();
		}
	}
}
Send Data with Http request format
in Xively
void sendData(String thisData)
{
uint8_t content_len[6] = { 0 };
String TxData;
if (myClient.connect() == RET_OK) // RET_OK
{
Serial.println("connecting..");
// send the HTTP PUT request:
TxData = "PUT /v2/feeds/";
TxData += FEEDID;
TxData += ".csv HTTP/1.1\r\n";
TxData += "Host: api.xively.com\r\n";
TxData += "X-Apikey: ";
TxData += APIKEY;
TxData += "\r\n";
TxData += "Content-Length:”;
itoa(thisData.length(), (char*) content_len, 10);
TxData += (char*) content_len;
TxData += "\r\n";
TxData += “Content - Type: text / csv\ r\ n ";
TxData += "Connection: close\r\n";
TxData t = “\r\ n ";
TxData += thisData;
TxData t = "\r\n\r\n";
nyClient.send((String) TxData);
lastConnectionTime = millis();
}
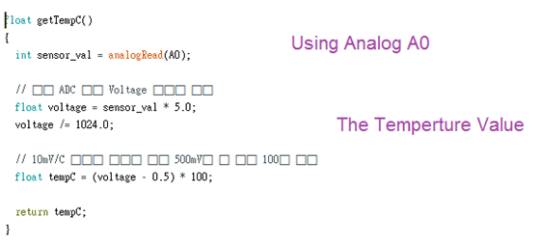
}Get Temperture
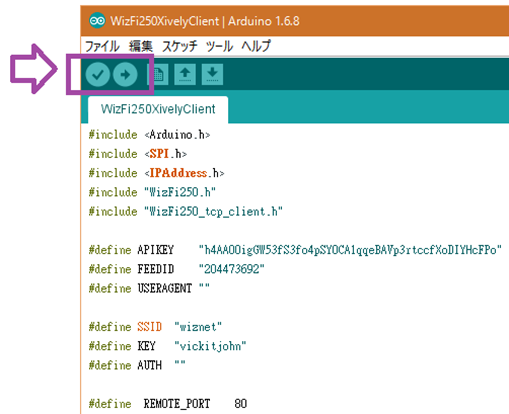
Then, you can Verify (Ctrl
R) and Upload (Ctrl U) the program to Arduino Uno by configuration tool.
Open Serial Monitor (Ctrl+Shift+M)
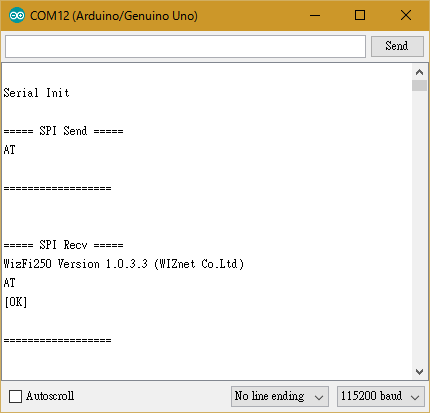
COM12 (Arduino/Genuino Uno)
Serial Init
===== SPI Send =====
AT
==================
===== SPI Recv =====
WizFi250 Version 1.0.3.3
(WIZnet Co.Ltd)
AT
[OK]
==================
===== SPI Send =====
AT+MECHO=0
==================
===== SPI Recv =====
AT+MECHO=0
[OK]
==================
<Send AT Command>
AT+WNET=1
[OK]
<Send AT Command>
AT+WLEAVE
[OK]
<Send AT Command>
AT+WSET=0,wiznet
[OK]
<Send AT Command>
AT+WSEC=0,,vickitjohn
[OK]
<Send AT Command>
AT+WJOIN
Joining : wiznet
Successfully joined :
wiznet
[Link-Up Event]
IP Addr
: 10.0.1.5
Gateway
: 10.0.1.1
[OK]
<Send AT Command>
AT+FDNS=api.xively.com,1000
64.94.18.120
[OK]
<Send AT Command>
AT+SCON=O,TCN,64.94.18.120,80,,0
[OK]
[CONNECT 0]connecting..
<Send AT Command>
AT+SSEND=0,0.0.0.0,80,201
[0,,,201]
[OK]HTTP/1.1 200 OK
Date: Thu, 07 Apr 2016
01:01:06 GMT
Content-Type: text/plain;
charset=utf-8
Content-Length: 0
Connection: close
X-Request-Id:
b0873f144c884cfe7158b579a73cd7a4346aa4fc
Cache-Control: max-age=0
Vary: Accept-Encoding
<Disassociate>
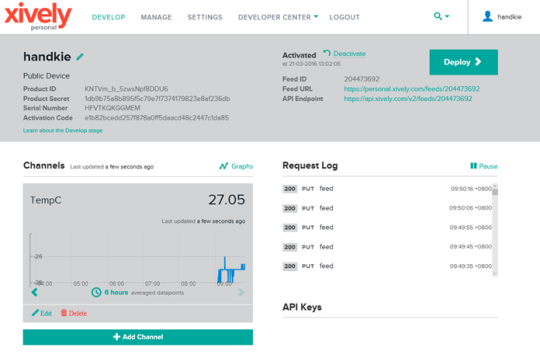
disconnecting.Example Result:
Record the Temperature
from 9:00am to 9:50am