BLE 以太網精簡網關是數據採集器通過以太網傳輸把從 BLE(低功耗藍牙)所收集到的數據傳送到雲服務器。
系統配置
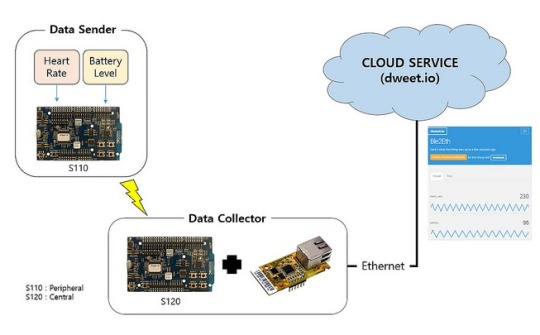
整個系統包含數據發送器,數據採集器和雲服務器。數據發送器測量心臟速率和發送到數據收集器。對於數據發送的軟件,我們使用 Nordic 提供的ble_app_hrs_s110 示例代碼。我們將使用虛擬數據為心臟速率和電池電量。
數據收集器收集由數據發送方發送來的數據,和所收集的數據發送到雲服務器。 (在這個帖子中,我們將使用 “dweet.io” 的服務)。對於數據採集器的軟件,我們結合了 Nordic 的 ble_app_hrs_c_s120 例程和 W5500 IO 庫。
硬件
- 數據發送器:nRF51 DK x 1
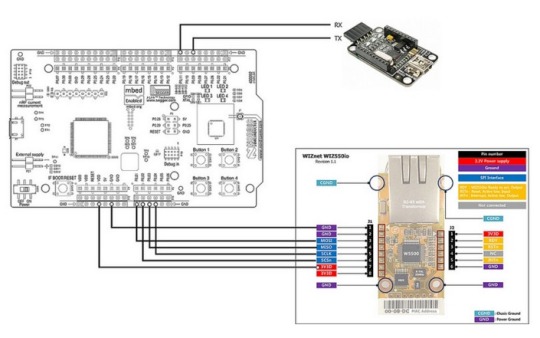
- 數據收集器:nRF51 DK x 1/WIZ550io x 1/XBee USB 網卡
為了檢查調試日誌和以太網功能,UART 連接到 USB 模塊和 WIZ550io 如下。

軟件
你可以從 GitHub 的存儲庫中下載 Eclipse 項目和源代碼。從 GitHub 下載檔案後,將它們保存在下面的路徑。

數據發送方
(1)開發環境
導入現有項目
- [滙入] – [現有項目到工作區]
- 選擇根目錄

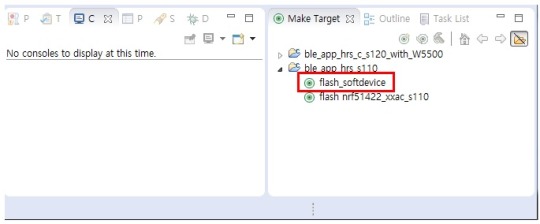
(2)上傳 SoftDevice
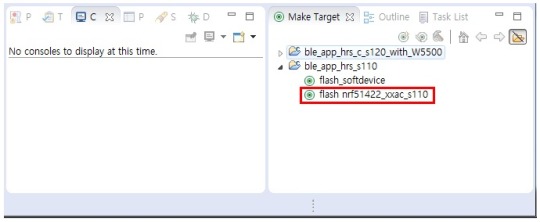
(3)上載應用
數據採集器
(1)開發環境
導入現有項目
- [滙入] – [現有項目到工作區]
- 選擇根目錄

(2)上傳軟件
(3)上載應用

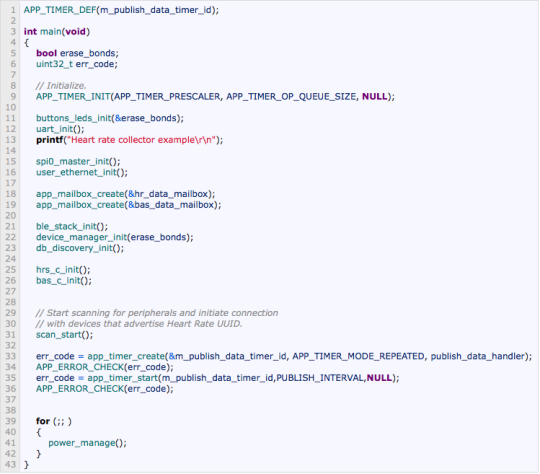
- 1〜2:設置計時器時間間隔(300毫秒),以發布到雲服務及初始化
- 16:初始化 SPI 接口以控制 WIZ550io
- 17:初始化以太網(IP 地址和網絡配置)
- 19〜20:初始化信箱(如果 HR 事件和 BAS事件發生時,值被保存到一個郵箱)
- 22〜24:初始化 BLE 中央堆棧。
- 26〜27:初始化 HR(心率)和 BAS(電池)集電極
- 32:BLE 外設掃描和連接掃描
- 34〜37:創建發布定時器並開始
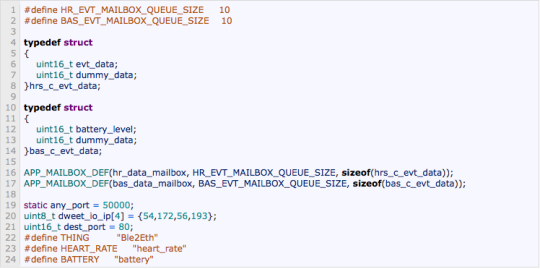
- 1〜2:設置郵箱隊列大小(QUEUE_SIZE)
- 4〜14:初始化心率和連擊級別的數據格式
- 16〜17:初始化郵箱
- 19〜24:信息要發送的數據dweet.io
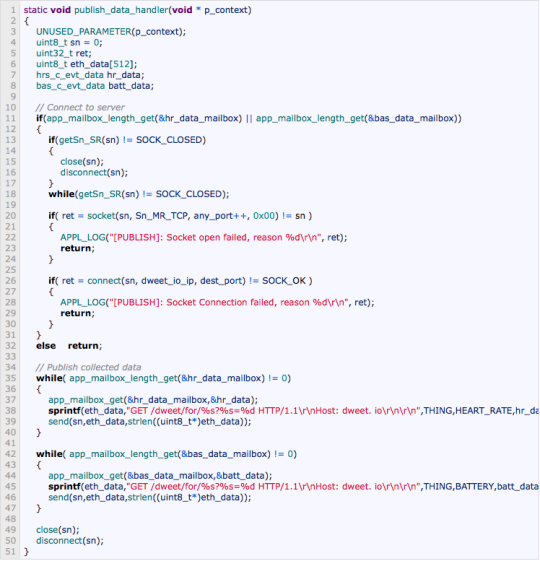
publish_data_handler’ 進行每隔 300ms 的建立與 dweet.io TCP 連接,並發送該麵糊數據和心臟速率的數據。
當執行 ‘publish_data_hander“,郵箱數據通過以太網上發射
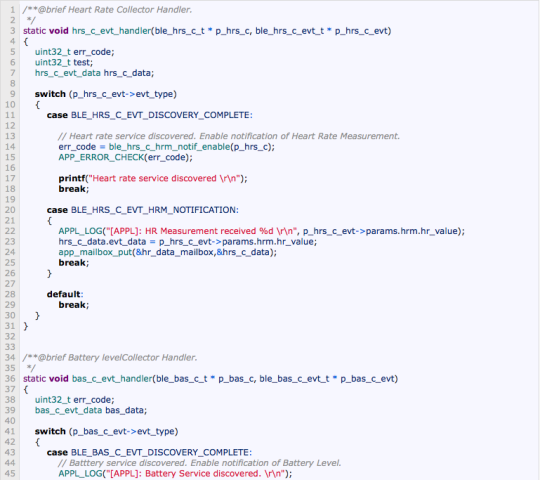
- 20〜26:當心臟速率通知事件發生時,數據被保存在郵箱
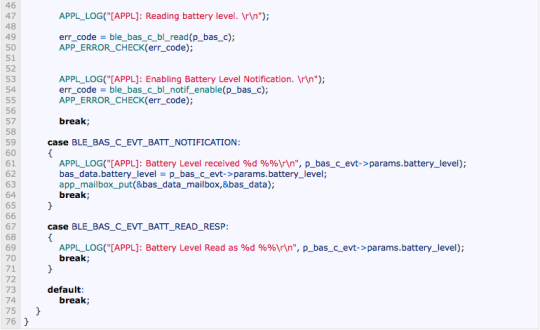
- 59〜65:當電池通知事件發生時,數據被保存在郵箱
- 當執行 “publish_data_handler” 時,在郵箱中的數據上即從以太網發出
檢查在雲服務中的數據(dweet.io)
在 dweet.io 的免費版本的服務,數據不能夠保存在數據庫中。 因此,您可以檢查網頁瀏覽器中的數據沒有具體的配置或密鑰。只需輸入網址 ‘https://dweet.io/follow/“ 末端加上定義物件的名稱,如:“https://dweet.io/follow/Ble2Eth”。
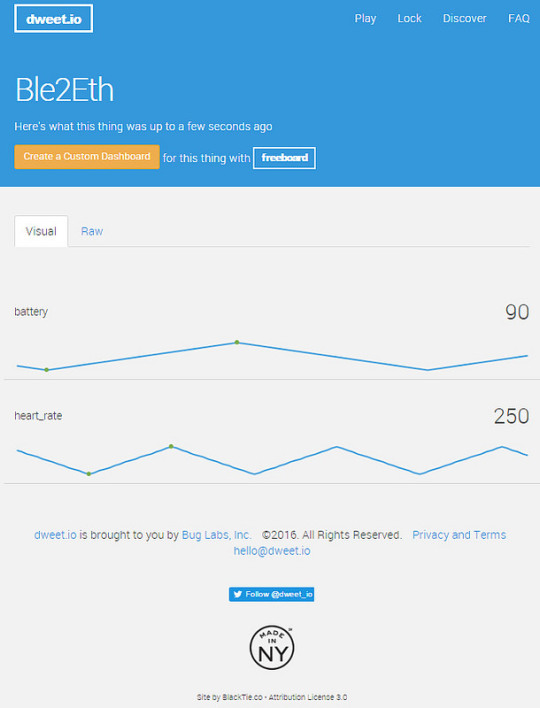
至於如何使用 dweet.io,請參閱網站 dweet.io