項目描述
此項目通過使用Ethernet Shield及Twitter推送來控制一個情景燈。
步驟1:材料
這個項目用到了很少的材料,有很多是不必要的。你也可以改變燈的外形,這樣可能會用到更少材料。
電子零件
◾Arduino Uno R3(我買了一個SainSmart版本,以削減成本)
◾Arduino Ethernet Shield(我在Radio Shack只花了10美金就搞定了)
◾4個Led
◾網線
◾電源適配器
◾焊錫
裝飾材料
◾亞克力盒子(我在沃爾瑪倉儲區找到了一個預制的)
◾少量約1/2英尺厚的木頭
◾橡膠墊腳
◾木染料
◾磨砂玻璃噴漆
◾泡沫塑料(用來放Arduino)
◾單乙烯基(做一個可在亞克力上噴漆的模具)
◾釘子
◾木膠
需要工具
◾烙鐵
◾電鑽
◾射釘槍
◾熱膠槍
◾模切繪圖機(用於磨具,不必須有)
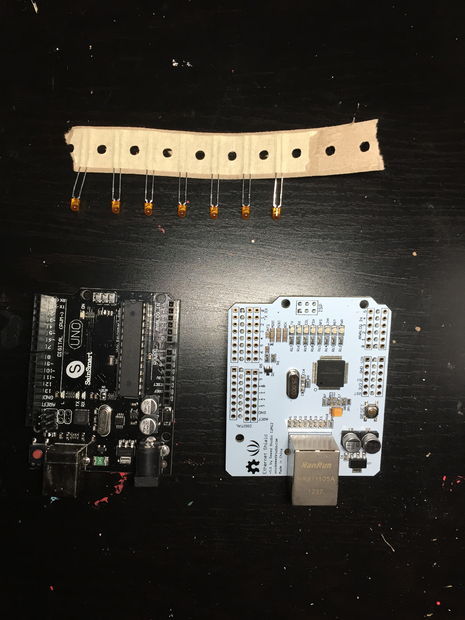
步驟2:電子器件構建

受電子知識的限制,我盡量將一切簡化。我把led燈直接焊接在了Ethernet Shield上。使用了12和13端口。而前後講Ethernet Shield插入到Arduino對應引腳上。
步驟3:木頭盒子

我構建了一個木頭盒子,這樣亞克力盒子就能放在裡面了。並在一面打了一個洞,如此ethernet 線材及供電線材可以透過來。
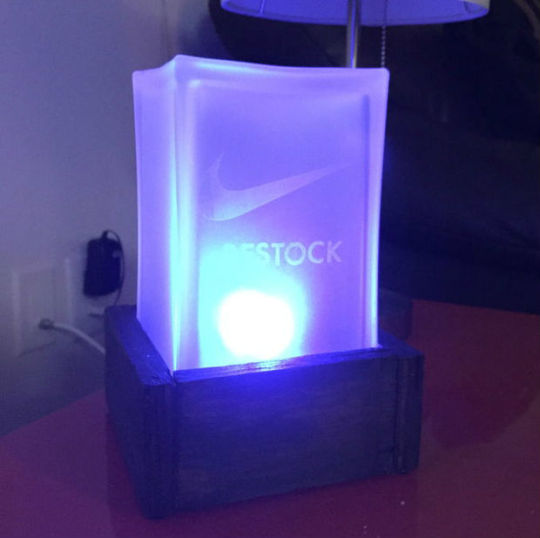
步驟4:亞克力盒子

我很幸運找到了一個夠透的亞克力盒子,你可以盡可能的簡化你的構建。我在與木頭盒子相對應的位置鑽了一個洞,這樣線材就可以輕松的插到燈上。
鑽完洞,我用磨砂玻璃噴漆給他罩了一層外衣。一旦射出來盒子裡的圖形光可見。圖像就會清晰的看到。
步驟5:泡沫塑料盒子
我用了一個小薄片的泡沫,並把亞克力盒子的開口按進了泡沫。而後在泡沫中留下一個印記,隨後就開始切割。根據泡沫上的印記,講Arduino放到裡面,就構建出鑲嵌物的位置了。
步驟6:Arduino代碼
以下代碼是用於Nike Restock 鬧鐘的代碼。你需要更改代碼中的ip地址及mac地址。
/*
Twitter Client with Strings

 This sketch connects to Twitter using an Ethernet shield. It parses the XML
 returned, and looks for this is a tweet

 You can use the Arduino Ethernet shield, or the Adafruit Ethernet shield,
 either one will work, as long as it's got a Wiznet Ethernet module on board.

 This example uses the DHCP routines in the Ethernet library which is part of the
 Arduino core from version 1.0 beta 1

 This example uses the String library, which is part of the Arduino core from
 version 0019.

 Circuit:
  * Ethernet shield attached to pins 10, 11, 12, 13

 created 21 May 2011
 by Tom Igoe
 modified by Amanda Ghassaei June 2012

http://www.instructables.com/id/Twitter-Controlled-Pet-Feeder/

 modified again by cdw181818 December 2014

 This code is in the public domain.

 */
#include
#include

//variable to prevent overfeeding
boolean nikeRestock = 1;

// Enter a MAC address and IP address for your controller below.
// The IP address will be dependent on your local network:
byte mac[] = {
  0x00, 0x00, 0x00, 0x00, 0x00, 0x00 };
IPAddress ip(xxx,xxx,xxx,xx; //<<< ENTER YOUR IP ADDRESS HERE

// initialize the library instance:
EthernetClient client;

const int requestInterval = 60000;  // delay between requests = 1min

char serverName[] = "api.twitter.com";  // twitter URL

boolean requested;                   // whether you've made a request since connecting
long lastAttemptTime = 0;            // last time you connected to the server, in milliseconds

String currentLine = "";            // string to hold the text from server
String tweet = "";                  // string to hold the tweet
boolean readingTweet = false;       // if you're currently reading the tweet

void setup() {

  pinMode(12, OUTPUT);
  pinMode(13, OUTPUT);

  // reserve space for the strings:
  currentLine.reserve(256);
  tweet.reserve(150);

  // initialize serial:
  Serial.begin(9600);
  // attempt a DHCP connection:
  if (!Ethernet.begin(mac)) {
    // if DHCP fails, start with a hard-coded address:
    Ethernet.begin(mac, ip);
  }
  // connect to Twitter:
  connectToServer();

  testing();
}

void loop()
{
  if (nikeRestock){
    if (client.connected()) {
      if (client.available()) {
        // read incoming bytes:
        char inChar = client.read();

        // add incoming byte to end of line:
        currentLine += inChar;

        // if you get a newline, clear the line:
        if (inChar == 'n') {
          currentLine = "";
        }
        // if the current line ends with , it will
        // be followed by the tweet:
        if ( currentLine.endsWith("")) {
          // tweet is beginning. Clear the tweet string:
          readingTweet = true;
          tweet = "";
        }
        // if you're currently reading the bytes of a tweet,
        // add them to the tweet String:
        if (readingTweet) {
          if (inChar != '<') {
            tweet += inChar;
          }
          else {
            // if you got a "<" character,
            // you've reached the end of the tweet:
            readingTweet = false;
            Serial.println(tweet);

            if(tweet == ">restock"){
             digitalWrite(12, HIGH);
             digitalWrite(13, HIGH);
             Serial.println("LED ON!");
             delay(360000);//turn on for 1 hour
             digitalWrite(12, LOW);
             digitalWrite(13, LOW);
             nikeRestock = 0;
            }
            if(tweet != ">restock"){
             digitalWrite(12, LOW);
             digitalWrite(13, LOW);
             Serial.println("LED OFF!");
            }

            // close the connection to the server:
            client.stop();
          }
        }
      }
    }
    else if (millis() - lastAttemptTime > requestInterval) {
      // if you're not connected, and two minutes have passed since
      // your last connection, then attempt to connect again:
      connectToServer();
    }
  }
  else if (millis() - lastAttemptTime > 14400000){//if four hours has passed since last feeding
    nikeRestock = 1;
  }
}

void testing(){
  digitalWrite(12, HIGH);
  digitalWrite(13, HIGH);
  delay(1000);
  digitalWrite(12, LOW);
  digitalWrite(13, LOW);

}

void connectToServer() {
  // attempt to connect, and wait a millisecond:
  Serial.println("connecting to server...");
  if (client.connect(serverName, 80)) {
    Serial.println("making HTTP request...");
  // make HTTP GET request to twitter:
    client.println("GET /1/statuses/user_timeline.xml?screen_name=nikestore&count=1 HTTP/1.1");
    client.println("HOST: api.twitter.com");
    client.println();
  }
  // note the time of this connect attempt:
  lastAttemptTime = millis();
}
步驟7:完成
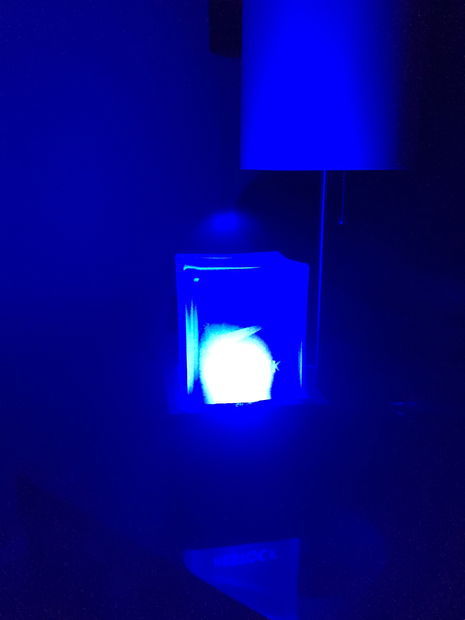
在給Arduino上傳程序之後,我把他放到了泡沫墊中,並插上線材。這樣就安裝好了一個木頭盒子。而後在每個角上點一點熱熔膠,並蓋上亞克力盒子。
剩下的就是在出口那插入電源適配器,並將網線插到路由上。燈會立即點亮,這樣就可以開始設置了。接下來就可以等待restock的信息推送了!