As the modern world is towards to the idea
on Internet of things (IOT), Ethernet has been one of the important
communication interfaces through TCP/IP protocol to communicate with different
kinds Cloud servers to apply on the core idea of IOT on monitoring each kind of
devices or sensors that will be used.
In this article, it will represent to you
to understand a simple method on communicating with a cloud server called
(Xively) by using a Hardwired TCP/IP solution – W5500 with YwRobot Easy module
shield that provides current temperature and humidity sensors.
Required equipment:
1.
W5500-EVB – Evaluation board for
W5500 chip
2.
YwRobot Easy Module Shield that
included DHT11 temperature and humidity sensor.
3.
Xively personal account
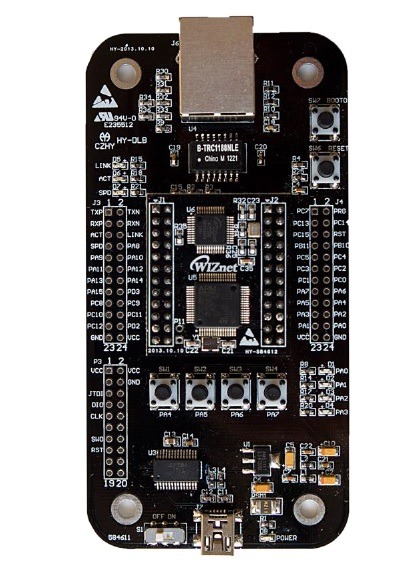
First of all, We need a board that allow us
to received data from the sensors and deliver this information to the server
through W5500 chip. In this case,I had used W5500-EVB to do this testing. It
has STM32F103RCT6 MCU and has external pins from the board that could easily
connect with Easy module shield.
The following figure is the W5500 Evaluation board (EVB) for this article.
Connect to Xively Server:
Before we starts to talk about the program for this application, we are required to create an personal
Xively account to communicate.
For creating your
own account, please go to the following link:
https://personal.xively.com/signup/
After you had created the account, please follow
the following steps to create your own server that could communicate with your
device.
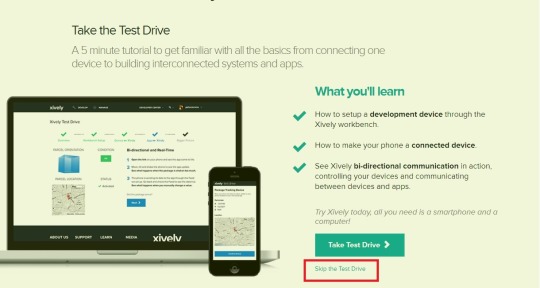
Step 1. Press skip to add
device section
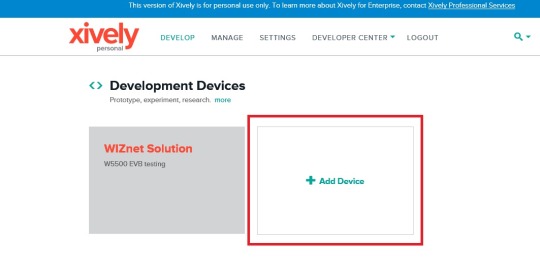
Step 2. Press create your
own device by pressing add device
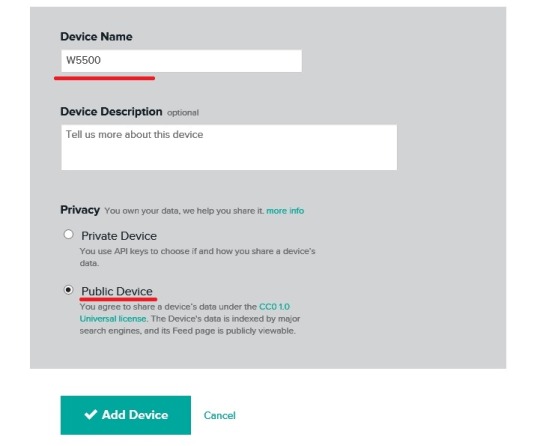
Step 3.Please
set to Public device to allow your device to access.
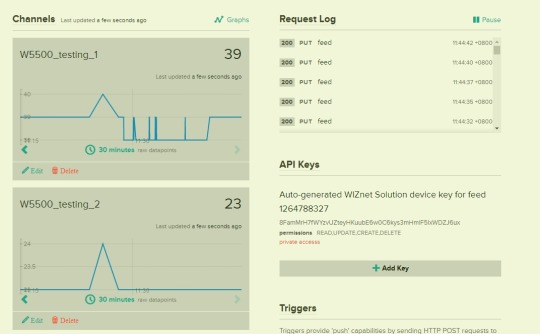
After you had created the device, it allows
you to create channels for receiving your data, please create 2 channels for
receiving humility and temperature values.
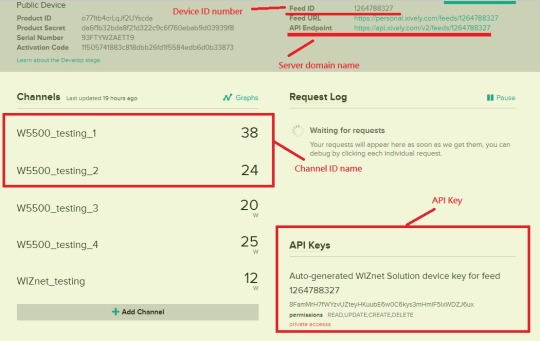
After that, we need to gather some
information before we head to our programs as the figure shows.
1.
Device ID number
2.
API key
3.
2 Channel’s ID name – In this
application note, I will use W5500_test_1 and W5500_test_2 for receiving these
values
4.
Server domain name and IP
address
The following figure shows the information that you could find from the Xively page of your device.
Source Code:
By using this information, we could deliver
it to W5500-EVB’s HTTP client reference source code. Please find the following
link to download this modified source code.
https://drive.google.com/file/d/0B0GWlyVLRcvNRTl0ZUNZQzFSV28/view?usp=sharing/
Xively
server is using HTTP request format to communicate with the server. There are
API documents that could teach you in detail on how to communicate with the servers
by using HTTP request format.
https://personal.xively.com/dev/docs/api/
The source code has been modified to
communicate with Xively server. However, this source code does not included DNS
function. Therefore please use command to ping the Xively’s API server and check
the IP address.

The above figure shows the location to modify the IP address for
Xively server in main.c file.
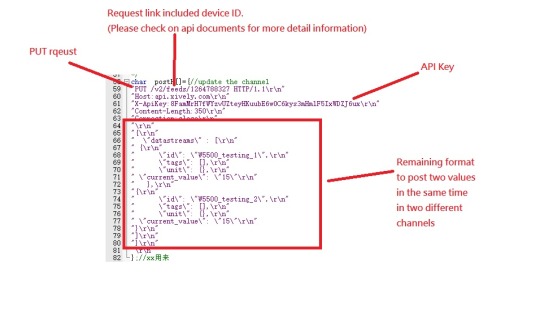
The above figure shows the HTTP request
method on using HTTP put request to update the 2 channels in the same time.
For more information about the HTTP request method in this example, please refer the
following link:
https://personal.xively.com/dev/docs/api/data/write/single_datapoint_to_each_datastream/
Connect the YwRobot Easy Module Shield and communicate with the Xively server:
For this application, I had used YwRobot Easy Module Shield’s
DHT11 sensor for this article to gather the temperature and humidity .
By connecting VCC and GND to the shield it provides power to the shield
to activate normally. After that, we need to connect PA12 pin of W5500-EVB with
the pin that shows on the following figures.
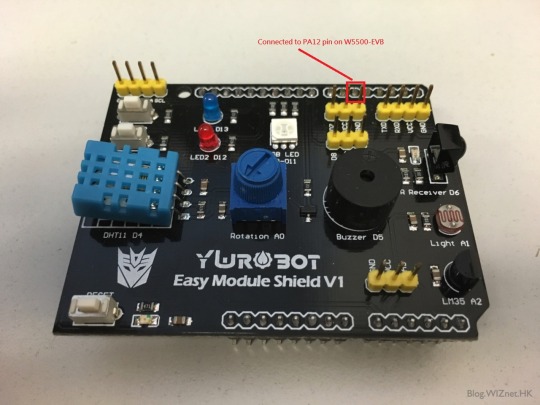
The above figure shows the pin that needs to be connected with the W5500-EVB
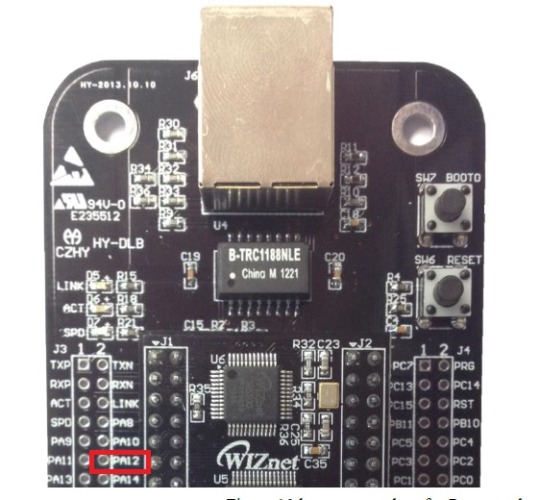
The pin on W5500-EVB that will be connected to the Easy module Shield.
After these two pins has connected, you could use this GPIO pin to collect sensor’s readings from DHT11 on the Easy module board.
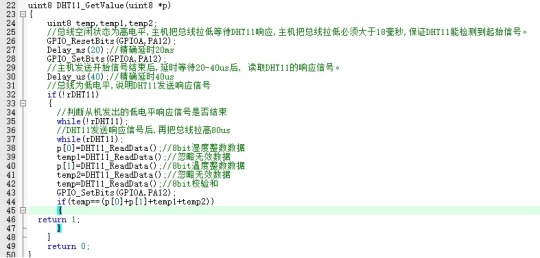
The
above source code is doing the connection and collects the sensor’s reading from DHT11 to the evaluation board.
The
values that had highlighted on the above codes are the updating values for the
channels. Before saving this group of string into an array of characters for uploading purpose, you should modify these values before you upload it to the Xively server.
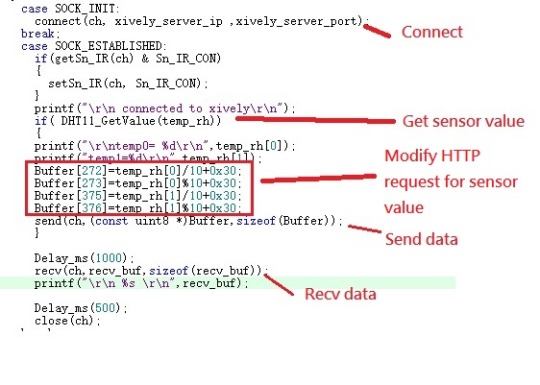
The above figure shows the TCP/IP communication method base on this W5500-EVB.
After you had the understanding on modify the values of the sensor, you could use the above method to send your updated values by using TCP/IP connection to the Xively Server.
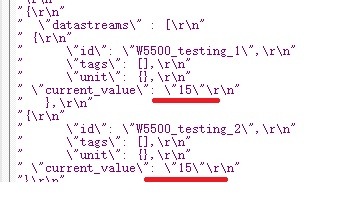
Results:
Result from Xively Server:

Serial Message result:
HTTP/1.1 200 OK
Date: Thu, 07 Apr 2016 03:44:01 GMT
Content-Type: application/json;
charset=utf-8
Content-Length: 0
Connection: keep-alive
X-Request-Id: ebd5af90501c53b20961de636cdc0a4a68e8460f
Cache-Control: max-age=0
Vary: Accept-Encoding